Short introduction: nanoindentation
Instrumented indentation tests, commonly known as nanoindentation, allow the precise application of a defined force of an indenter tip while simultaneously measuring the indentation depth into the sample substrate with sub-nanometer accuracy.
Further information
Motivation and advantages compared to common hardness testing methods
Standard hardness testing methods like Vickers, Knoop or Brinell optically evaluate the residual imprint after an indentation. Events like cracking during an experiment, pressure-induced phase transformations or simply elastic recovery cannot be examined with this method and require a depth-sensing technique.
The industrial application of thin films technology and the ever higher demands on material characterization have made an accurate determination of the mechanical properties of thin films highly necessary.
To avoid substrate effects on films which are sometimes only a few micrometers thin, it has been necessary to limit indentations to depths of only a few 100 nm. The lateral dimension of such an indent is near the optical resolution limit so an optical evaluation of the indents is not practical. High-resolution imaging methods like SEM and AFM are cost-intensive and time-consuming. Precise determination of the specimen geometry additionally plays an important role when dealing with such low indentation depths. Common hardness testing methods assume an ideal indenter tip geometry, which fails due to tip rounding and imperfections of the polishing process.
Due to the implementation of complementary imaging methods like SPM and AFM or of high-precision sample stages, the mechanical characterization of the micro structure and the analysis of fundamental deformation processes play an ever important role in the field of Nanoindentation.
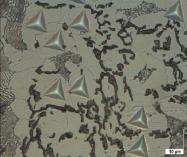
Fig. 1 Explicitly targeted indents in gray cast iron.
How does it work?
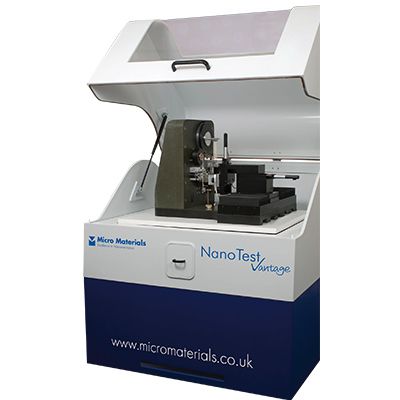
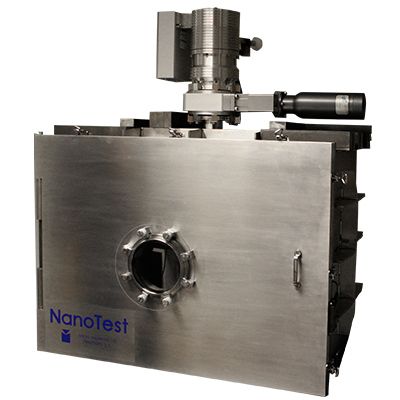
The NanoTest Vantage utilizes electromagnetic force application and capacitive depth measurement to measure the elastic and plastic properties of materials on the nano-scale.
Theory and Analysis
Depth-sensing nanoindentation enables the highly precise definition of both load and penetration depth during an experiment. Hence the applied load P and indentation depth h can both be controlled and simultaneously measured continuously over a complete load cycle.
1) Definition of experimental parameters
The user defines a load cycle which typically consists of a load, hold and unload period.
Load and unload rates can then be specified, with experiments being defined either by their maximum load or up to their maximum indentation depth. An experiment may either be load-controlled or depth-controlled by means of a quick feedback loop.
The shape of the loading curve strongly depends on the specimen and provides fundamental information on the material's properties. Polymers and very soft materials usually need a much longer creep period. So it is necessary to provide longer hold periods to minimize the creep exponent which can then be neglected during the unload period. Maximum load and maximum indentation depth will also influence the results. A phenomenon which is called the "indentation size effect".
2) Hardness and elastic modulus calculation
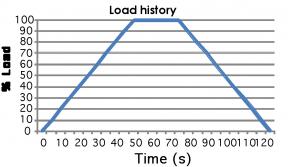
Fig. 2: In this example, the load is constantly increased to a peak load over a period of 50 s. After that, force is held for about 25 seconds, followed by constant unloading over a period of another 50 seconds.
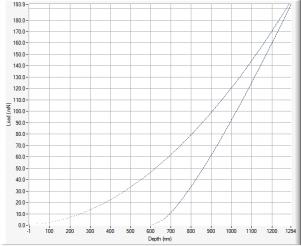
Fig. 3 shows the typical nanoindentation curve of an experiment on fused silica which is widely used as a reference material.
The Nanoindenter continuously captures the indentation depth before touching the sample and, after touching the sample, registers a surface contact based on a change in contact stiffness.
The load is then increased at a predefined rate, which causes the penetration depth to increase. Once the probe has reached the pre-set experiment target (either a maximum load or a maximum depth), the maximum load can be held to analyze creep properties. Afterwards the load is taken off the sample which leaves an indent.
The Oliver-Pharr polynominal curve fit method is typically used to analyze nanoindentation data. This method is based on Sneddon’s description of an effective indenter z = B * rn (for a conical probe n=1, B=cotΑ for a spherical indenter n=2 and B ≈ 1/2R.).
Pharr and Bolshakov describe the conventional load-displacement response with an arbitrary indenter geometry. They show that a polynomial curve fit like P = a*(hf – h)m on the unloading curve is the best way to describe the load-displacement curve. With help of the contact stiffness S = dP/dh and the probe's specific correction factor є this method calculates the contact depth of the probe:
Material hardness is defined as the quotient of peak load and the projected contact area:
The reduced elastic modulus however is calculated like this:
Use of the probe material's Young's modulus and the Poisson's ratio of both the probe's material and the sample results in:
The following parameters can be measured with the NanoTest system:
- Hardness
- Elastic modulus
- Creep
- Plastic depth/Contact depth
- Elastic recovery parameter
- Plasticity index
Mapping
Rather than selecting specific positions on a sample, mapping can sometimes be more useful to study the variation in mechanical properties across a larger sample area. Mapping can show inhomogeneities due to structural anomalies, differences caused by surface treatments or changes in properties at joints and phase boundaries.
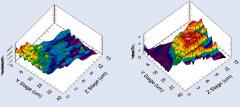
Fig. 4: 3D-image of the distribution of hardness and Young's modulus on a 15 x 25 indent array (1 µm pitch), taken on a solder joint, characterizes intermetallic phases.
Creating a depth profile with the load/partial-unload technique
In its beginnings, nanoindentation only measured an indent up to a defined depth or load. However, especially in film-substrate systems, the variation of the mechanical properties as function of the indentation depth is of special interest. The ‘load/partial-unload’ technique (LPU) which is included in the NanoTest software, allows loading/unloading at increasing target loads in a single indent cycle. This way, multiple hardness and modulus measurements can be made at different depths in only one cycle.
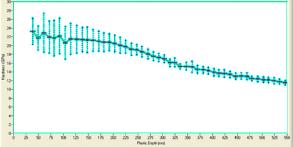
Fig. 5: Elastic modulus as function of depth on a hard amorphous carbon film on a soft substrate, determined with the LPU method.
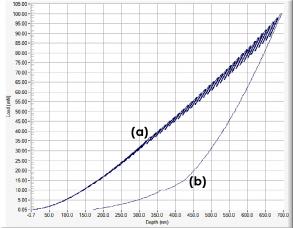
Fig. 6: (a) is a considerable kink in the loading curve. It marks the transition to substrate-dominated load support. A significant inflexion is seen on the unloading curve (b). It is the result of a phase transformation of the substrate silicon.
Creep
Indentation creep experiments are used to determine stress exponent and creep behaviour and, in combination with the high temperature module, the activation energy for creep processes.
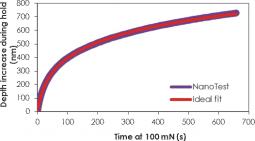
Fig. 7: Perfect agreement between fitted and experimental PMMA creep data to determine the viscoelastic properties of the polymer.
Wide load and penetration depth range
The NanoTest systems provide wide load and indentation depth measurement ranges, which optimize the load and depth resolutions according to the predefined peak load with help of a dynamic resolution system. This ensures an outstanding resolution over the entire measurement range. Ultra low noise and high sensitivity allow measurements of ultra thin films of only a few 10 nm thickness, for example in MEMS applications or measurements of very soft materials with an elastic modulus of only a few MPa.
The wide load range of 0 – 30 N additionally allows both tests on very hard materials like ta-C or DLC coatings as well as soft polymer layers and tissue samples.
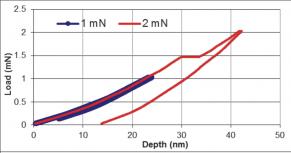
Fig. 8: Comparison of two indentation experiments on sapphire. A 1 mN peak load shows a completely elastic contact. The same experiment with a 2 mN maximum load shows a jump-in at approx. 1.5 mN due to plastic deformation.
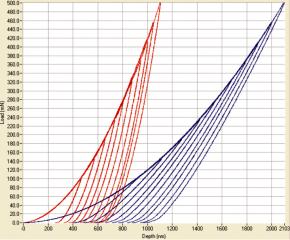
Fig. 9: 10 Indentations at maximum loads between 100 - 500 mN on fused silica (blue) and sapphire (red).
Videos
Contact

Navigation
Categories
Contact
Quantum Design s.r.l.
Via di Grotta Perfetta, 643
00142 Roma
Italy
| Phone: | +39 06 5004204 |
| Fax: | +39 06 5010389 |
| E-mail: | italy@qd-europe.com |

